Showing posts with label Holidays. Show all posts

Tuesday, July 3, 2012

I Love USA

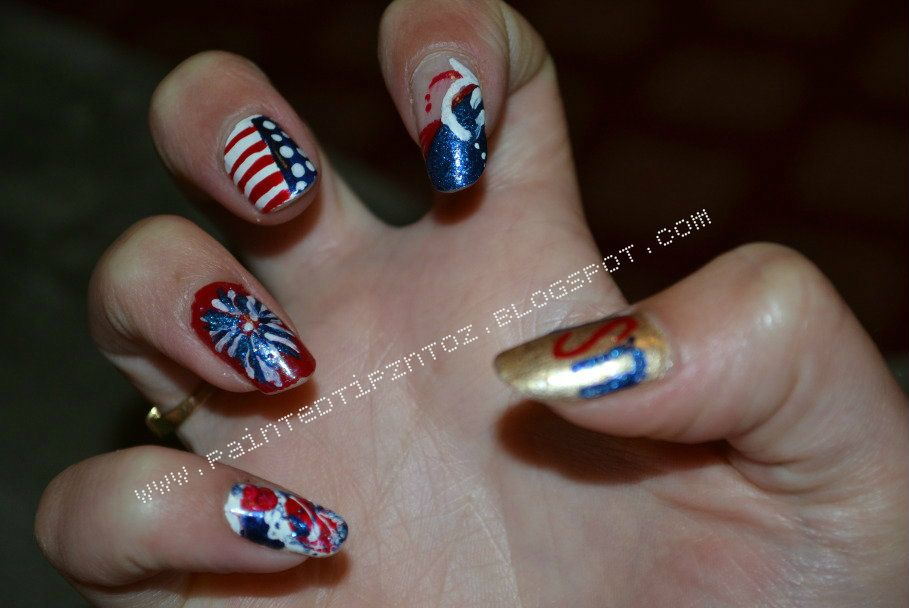
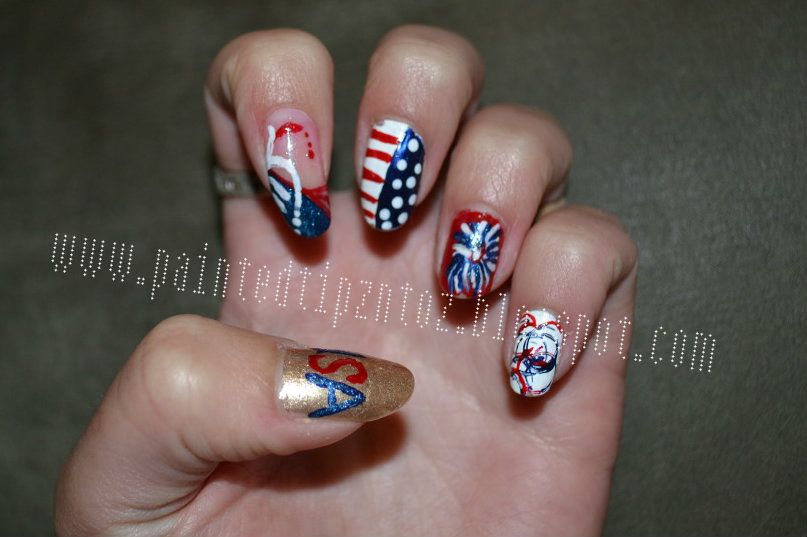
This year I knew I had to top last years 4th of July mani. So I spent a few days thinking about what design I wanted to do then I came up with this!


I thought it was very cute and I'm pretty sure I topped last year!! I received tons of compliments on this mani and most of the design was fairly easy.


Colors I used:
Thumb: "Big Spender" from Pro, "Fame" from Petites, "Skin Tight Denim Cream" from NYC, "Strapless" from Pure Ice, and "Primary Color" from Finger Paints.
Index: "Skin Tight Denim Cream" from NYC, "Primary Color" from Finger Paints, "Strapless" from Pure Ice, "French White Tip" from NYC
Middle: "Skin Tight Denim Cream" from NYC, "Primary Color" from Finger Paints, "French White Tip" from NYC.
Ring: "Skin Tight Denim Cream" from NYC, "Primary Color" from Finger Paints, "French White Tip" from NYC,
Pinky: "French White Tip" from NYC, "Skin Tight Denim Cream" from NYC, "Primary Color" from Finger Paints.


How I Did It:
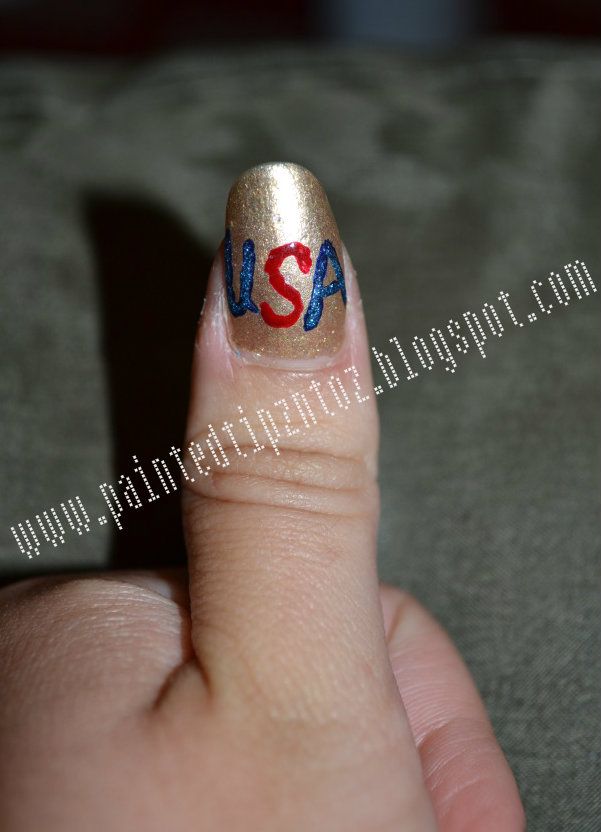
Thumb: The Base coat was two coats of "Big Spender" from Pro, under one coat of "Fame" from Petites. The writing was done with a paint brush using "Skin Tight Denim Cream" and then I put "Strapless" from Pure Ice over it to make the blue sparkle. For the Red ''S" I used "Primary Color" from Finger Paints.
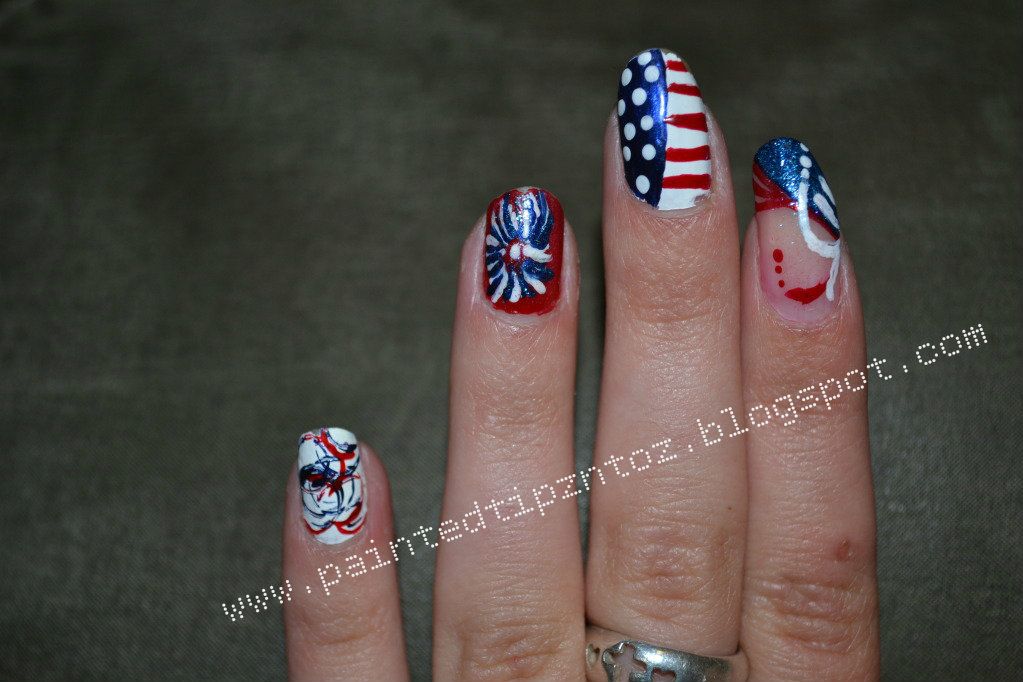
Index: For my Index finger, I used one coat or "French Lingerie" from Rimmel, this just give my nail a clear base. I did a diagonal tip using "Skin Tight Denim Cream" and "Strapless." For the details I used a fine tip brush and a dotting tool and used "Primary Color" and "French White Tip."
Middle: For my middle nail, I first painted it all white. Then I painted half of the nail using "Skin Tight Denim Cream." Again I used my paint brush and doting tool to create the stripes and dots.
Ring: My ring finger was a lot of fun! First, I painted the nail "Primary Color." Then I took my fine tip paint brush and made random, curved stripes with white polish. I came back through with blue polish and then again with white and add more blue until I had the firework the way I wanted it. This was my favorite nail of my whole manicure.
Pinky: I did both of my pinky fingers different. I couldn't decide on one design so I tried both. First I painted both nails solid white. Then, for the nail on my left hand, I dipped the end of straws in the red and blue polish and placed it on my nails. This was super easy and would make a neat full mani.
  For the nail on my Right hand, I did the splatter paint effect I did a few weeks ago. I changed nothing but the colors of polishes I used.
This manicure was definitely one of my favorites and I was very pleased with the way it turned out.


XOXO's
Love and Nail Polish,
Sierra.

Saturday, April 14, 2012

Easter Nail Art

So this post is a little late but happy late Easter!! I hope your Easter went great. Mine was good I went to S.C to see family. We went to my Granny's, which is what we do every year. We dyed eggs and had a great Easter dinner. But let's not forget what the real meaning of Easter is about. Our Lord and Savior Jesus Christ has risen! What an amazing thing. I am so thankfully for my salvation and that I have a savior who loves me more than I can even imagine.


For my Easter mani I decided to paint some major nail art.

Colors I Used:                    
Thumb: "134 French White Tip" NYC and "Lemon Fizz" China Glaze, and *No Name* from Stripe Rite
Index: "Garden" Revlon
and "Green Apple" Crayola
Middle: The Base Coat was a Franken I made, then the dots were "307 No Hard Feeling" Sally Hansen, and a purple polish from California Nails
Ring: "Garden" Revlon, "134 French White Tip" NYC, "Waterfall" Revlon
& "Warm and Fozzie" OPI
Pinkie: "Love" Pure Ice and *No Name* from Stripe Rite


I'm not going in to depth about how I did this manicure, because I don't have time. However, I did use my dotting tool for the clouds on my cross nail and there will be some colors I did not list. I ended up lightening a few of my polishes with white polish, because I didn't have the shade I wanted. I guess I need to go polish shopping haha. This mani was fairly easy and I really liked the way this mani turned out.
XOXO's
Love and Nail Polish,
Sierra

Wednesday, February 15, 2012

Valentine's Day Nails

Valentines was here once again.... Can't you feel my excitement? haha Since I'm a single girl, this day really wasn't very exciting. However, I did decided to make the best of it and do a relaxing facial and pedicure!!


For my Valentines manicure I decided to try out the Sally Hanson Salon Effects. This was the first time I had used any of the Salon Effects so it definitely was a different experience. I picked the "Love Always" effects from their Valentines collection. I thought I would really like the design however, it wasn't my favorite. But there were a few reasons for that. First since I had never used the Salon Effects I had a few issues getting them to cover my nails. I also had some issues with placing them own my cuticles. Then when I tried to cut the nail strip it started ripping. So on one or two of my nails I ended up folding the nail strip back over my nails. However, I know both of these problems were due to my inexperience.                                                                                                                                                  Next, I had some issues getting the nail strip to stick to my nail. I am not sure if this was just the strips I had or if this is a common problem. The strips started peeling away from my nail tips. So I secured them with a little clear coat. I also added a very thick top coat. Sadly, after day three I had some chipping at the edges of my nails. But I easily fixed the chips with some white nail polish. Many people say they do not chip easy but I will say I am rather hard on my nails. So the chipping was mostly my fault.
I will say I really did like the design! The I Love You written in different languages was definitely an eye-catcher. I got lots of complements and everyone seemed to be impressed. It felt a little weird explaining to my friends that they were actually stickers and not a free handed design. Since they know what a nail art fanatic I am. However, I still think the design rang Valentine's Day.

The Sally Hanson Salon Effects are definitely worth the money if you are looking for a design you don’t think you could free hand. Just be prepared to spend some time carefully positioning the nail strip because it is very tedious.
What do you think? Have you tried Sally Hanson Salon Effect?Did you have these problems too?


XOXO's
Love and Nail Polish,
Sierra 

Tuesday, January 3, 2012

CHRISTmas Haul *Picture Heavy


Christmas 2011 went amazing!!!!  I was able to spent time with family and made some great memories. I help my siblings assemble all their toys and got to see my parents faces when they open their gifts! Over all my Christmas went great and I got so amazing polish that I can't wait to use. I am truly blessed.
As the holidays come to an end let us all keep in mind the real reason we celebrate CHRISTmas!!!


Hot Couture-Pure Ice Crackle.
"Hot Couture" is a bright pink crackle polish. This polish is very opaque, applies really smooth and shatters great. I paired this color with a lime green base coat and the color contrasted amazing.


Fuchsia Fever & Facets of Fuchsia-From Revlon. 
"Fuchsia Fever" Is a bright pink polish. This polish is lighter than the polish above, but with 2-3 coat it is a very pretty pink shade.
"Facets of Fuchsia"  I had been looking EVERYWHERE for this polish and never could find it. So when I saw this polish I think I actually squealed in excitement. "Facets of Fuchsia" is a glitter packed polish full of bright purple hexes and smaller glitter. It look amazing with a black base coats and I can't wait to try it out.


Urban-Night and Cha Cha Cha-From China Glaze.
"Urban-Night" is a DEEP purple polish. It is about 3 shades darker in person than in the picture. However, it is a very pretty purple color. The polish is super opaque and very smooth. I used two coats of polish, but you could probably get away with one.
"Cha Cha Cha" This was one of the polishes on my nail polish list! So now I can happily check that off!! "Cha Cha Cha" is a light/bight/medium green polish with a sort of metallic undertone. I'm not really sure how to explain this one. But it is super pretty and I definitely see myself using it for some of my summer time manicures.


Military Green, Stunning Stilettos & Catwalk Queen-From Finger Paints.
"Military Green" is a green/gray nail polish, it isn't my favorite color. However, it will do great for some nail art I have in mind.
"Stunning Stilettos"- Is a light gray polish! I love this shade it is not too dark or too light. I can't wait to try it as a full manicure.
"Catwalk Queen-Is a yellow/orange polish. It definitely has more yellow than orange in it and the polish is a little lighter in person. I don't think this polish would look good as a full mani, but it would look good as an accent color.


I could not find the name for this polish-From Stripe Rite
This polish is a BRIGHT orange color, the picture above doesn't show off how bright this polish actually is. The brush for this polish is great and you are able to paint a lot of different nail art designs with it. The polish applies well and I really like it.


"Yellow" Nail Art Pen-from Fing'rs-
"Yellow"- Is a mini nail art pen in bright yellow color. I have used nail art pens from other brands, but never from Fing'rs. I'm curious to see how to applies. I'll tell you when I get around to trying this pen.


"Glistening Sunshine"-from Super Nail
"Glistening Sunshine" is a fine nail glitter in a bright yellow color!! This will look amazing in some spring/summer manicures I have in mind. I bought a sliver glitter from this brand a while back, so hopefully thing glitter will be just as good!!


Over all my Christmas was fabulous! I hope yours was amazing also!!
XOXO's
Love and Nail Polish,
Sierra

Sunday, January 1, 2012

New Year’s Blingy Manicure

Every New Years I try to pull off the blingiest, sparkly, fabulous manicure of the year. This year I achieved exactly the look I was wanting.


Colors I used:
Base Coat- "Positive Energy"- Nicole by OPI
Thumb and Ring Finger- "Set the Stage"-Sally Hansen Xtream Wear, Gold Glitter over Base Coat
Index- "Set the Stage"- Sally Hansen Xtream Wear, Gold Glitter over Base Coat. "Pearl Black"- Kiss Nail Art (For writing)
Middle and Pinkie- Black: "Twilight"- Jordana, "Night"-Petites, "Pearl Black"- Kiss Nail Air. Gold: "Big Spender" Pro, "Flower Girl" Sinful Colors Nail Art, "Set the Stage"-Sally Hansen Xtream Wear, and Gold Glitter. Sliver: "Insolence"- Rimmel, "Positive Energy"-Nicole by OPI and "Rock Star"-Kiss Nail Art.
**Extra the Gold Glitter I used was not nail glitter. It was craft glitter, but very fine.

How I did it-

To design my Thumb and Ring finger I started with a base coat and I paint 2 coats of "Set the Stage." Then I sprinkled on some gold glitter. I had some issues finding the jewels I wanted. So I actually found iron on jewels at Walmart for 1.99$ They were the prefect size and cheaper than the jewels I was looking for. I bought 2 packs and got over 300 jewels. To apply, I placed a dot of super glue on my nail and the jewel on top. I Carefully pressed down on the jewel to make sure it stuck.
Next I painted my Index finger. I did it the same way as my thumb except I painted 2012 using a nail art brush.
My middle and pinkie fingers were a little more of a challenge. For them I did a gradient effect with glitter. I started by painting my nails "Positive Energy." Next, I sponged the black layer on, using "Twilight," "Night," and "Pearl Black." I had some issues getting the black to apply dark enough. But that could have just been the colors I was using. Then, I sponged on the gold, using "Big Spender," and "Flower Girl. After, the gold dried I used my dotting tool to picked out some of the glitter hexes from "Set the Stage". I placed them on the gold part of my nail and also sprinkled over some gold glitter. For the silver I used "Insolence," and "Rock Star" over my silver base coat. "Rock Star" was a glitter packed polish so I did not need to add any glitter.
I placed 2-3 coats of top coat over all my nails. However, I was paranoid that the jewels would fall off so I added 2-3 more coats of top coats to those nails.  Over all I loved this mani, I got lots of complements on them and they definitely said HAPPY NEW YEARS.

Friday, December 30, 2011

Christmas Day Manicure

My Christmas day manicure!!!!


Colors I Used:
Accent Nail- "Ruby Pumps"-China Glaze and "Pearl Black"-Kiss Nail Art
Other Nails- "First Time"-Pure Ice and "White"-LA Colors Nail Art

How I did It:
Since Christmas was just a few days away when I did this manicure I knew I wanted a festive look. So I decided to paint a cute, red and green presents. First, I started by painting all my nails, except for my ring finger, "First Time" from Pure Ice. I painted my ring finger "Ruby Pumps" from China Glaze.
Next, I painted the bow design. To do this, I painted a cross on all of my nails. Then, I added the two loops for the bow and the ribbon ends. Lastly I added jewels to the center on each bow and sealed with a top coat. It really is that easy and very quick! Plus I loved the festive look it gave my nails.
XOXO's,
Love and Nail Polish,
Sierra.

Wednesday, December 28, 2011

Reindeer NAILS!! with Santa!!


Colors I Used:
Reindeer- "French Lingerie"-Rimmel,
"Totally Toffee" and "Hot For Chocolate"-Revlon,
"Black Lace Cream" and "French White Tip" from NYC

Santa- "French Lingerie"-Rimmel, "French White Tip"- NYC,
"Primary Color"- Finger Paints, (To make the smile and nose I mixed "Primary Color" with a light pink.")

I did this manicure a few weeks before Christmas. It definitely wasn't my favorite nor the best nail art I have done. However, it was pretty cute!
XOXO's
Love and Nail Polish,
Sierra

Tuesday, December 20, 2011

Christmas Tree and Lights

The week I decided to go for an all-out Christmas design. So I figured what was more Christmas than a Christmas tree and Lights.  I think the design turned out great and it is definitely one of my favorites!

The colors I used in this manicure are:
For the French Tip= "French Tip" from NYC and "French Lingerie" from Rimmel
For the Tree= "Camouflage" from Rimmel, "Hot for Chocolate" from Revlon and random colors for the ornaments
For the Lights= "Yellow" and  "Pearl Black" from Kiss. "Bright Orange" "Red Glitter" and "Green Glitter" from LA Colors

To start this manicure I painted a basic white French tip.
Next, I did the lights. To paint the lights, I used a fine tip striper in black. I painted wavy lines down my nails, occasionally doing a loop. Once, the line was painted I added small black lines coming from the main black line. This is the line where I started the bulbs. To paint the Bulbs I used four different stripers. The colors I used for the bulbs were "Red Glitter," "Green Glitter,"  and "Bright Orange" From LA Colors and "Yellow" from Kiss.  I carefully placed the brush on the small black line. Then, I pulled the paint out to make the lights look attached to the wire. The Lights could have been a manicure by itself but I decided to add a Christmas tree to my Thumb. To paint the Christmas tree, I started by drawing three triangles, making the different levels of the tree. Next, I filled in each triangle using "Camouflage" from Rimmel. To make the stump of the tree I used "Hot for Chocolate" from Revlon and painted a small rectangle at the bottom of the tree. For the ornaments I used a red, yellow and orange polish. I carefully placed dots around the tree using my dotting tool.  To finish this Christmas inspired mani I place a clear top coat over to protect the design. Over all this mani was slightly difficult but if you have a steady hand it can be easily done.

XOXO's
Love and Nail Polish,
Sierra

Saturday, December 10, 2011

SnowMan!!


This week, I needed a quick mani and I wanted to start my Christmas designs. So after some thinking I decided to paint a snow man.
To start this mani I painted all my nails except my index finger "Scandal" from Pure Ice. On my index finger I used "French White" from NYC. After letting the base coat dry I added a sparkle polish from Pure Ice. This just helps the polish resemble snow.

To paint the snow man's features I used "Black Lace Cream" from NYC "Orange" from LA Colors. To make the eyes and smile, I dipped my dotting tool into black paint I placed on to an index card. For the nose I painted small orange stripe to resemble a carrot stick.
This was a super quick mani and I love the festive look it gave :)

XOXO's
Love and Nail Polish,
Sierra

Thursday, November 24, 2011

Plaid Mani and Happy Thankgiving!!!


HAPPY THANKSGIVING everyone!!! I hope your Thanksgiving has been great!! I can't express how thankful I am to all of you who read and support my blog. The feedback I receive makes writing even more enjoyable. I am also thankful for a loving and forgiving God, supportive Family, great Siblings that make me smile and the Best Friends a girl could ask for. Oh and nail polish haha.
After an exciting day of cooking and eating, I have time for a quick post then I am off to do some Thursday pre-black Friday shopping.

For my Thanksgiving manicure, I decided to go with plaid using fall colors. The colors I used for this mani were, "Hot Tamale" from I Love My Nails, "Big Night Out" from Rimmel, "Magic" from Pure Ice and "Flower Girl" from Sinful Colors. Painting a plaid design is super easy; however, it requires a very steady hand. I started by painting my base coat using "Hot Tamale".
Next, I used "Big Night Out" and made a tic-tac-toe grid on each of my nails. Then, I used "Magic" and made another tic-tac-toe grid slightly off center near the first grid. To add a little sparkle I took "Flower Girl" and add two random lines to the grids. TA-DA, if you are a little unsure about how to paint this design, YouTube has some great tutorials. I am hoping to get some of my own tutorials up. But that is a work in progress. Over all this manicure turn our rather good. I think it would look better with some other colors but I love the design.
Well again I hope your Thanksgiving was amazing.
XOXO's,
Love and Nail Polish,
Sierra.

Friday, October 21, 2011

Fall Nails


One of the biggest trademarks of fall, are pumpkins and that pretty much sums up my manicure for this week. I surprised myself with being able to achieve this design. Because I honestly didn't think I would be able to get the pumpkins painted right. But I think they turned out pretty good for my first time.

  For this mani I used "Magic" from Pure Ice on my thumb and ring fingers. This is a brown-ish/red polish and it looks amazing for fall inspired designs. For the rest of my fingers I used "Big Spender" from Pro. On the nails with "Big Spender" I used my dotting tool to paint six vertical lines of dots in the same colors that were on my pumpkins. To paint the pumpkins I used three different paint brushes and my dotting tool. I ran in to some problems with the shades of polish. So I ended up mixing "Orange" from LA Colors, "Sunny Side Up" from Wet and Wild and "Lemon Fizz" from China Glaze to make the three colors for the pumpkins and the stem of the pumpkins.  First I free handed the outline of the pumpkins in one of the shades of polish I made. Then using my dotting tool and a medium paint brush I filled in the outline. After, letting the base coat of the pumpkin dry, I added the stem and the highlights with my small tip paint brush. Over all this mani took about two hours total and it was a great fall design.


XOXO's
Love and Nail Polish,
Sierra

Monday, October 17, 2011

Candy Corn Nails

I was going to a party this past weekend and I wanted a cute, eye catching manicure. I looked at doing spider webs, leaves and a few other designs and I finally decided on Candy Corns!!

Look good enough to eat? ok well maybe not that good haha
This mani was super easy! For my two accent fingers I used "Big Spender" from Pro. This is my first time using this polish and so far I really like it. The polish takes about two coats to apply and it is a great gold shade. Also, the polish does not chip easy and the brush is a great size. I plan on using this color for a lot for future manicures. For my other nails I used "Orange" and "Yellow" from LA Colors and "White" from I Love My Nails. I first thought it would be easiest to tape each nail to get a straight line. But after using tape for one hand I decided it would be easier to just free hand. I also did the candy corns free hand. For them I first drew the outline in white. Then, I painted the orange, yellow and white letting each dry in between. For my ring finger I used the same colors and my dotting tool to make the dots in straight lines. This manicure took about an hour or so. But most of the time was spent waiting for polish to dry before I added the next color. I really liked the way it turned out and I got a ton of complements.
XOXO's
Love and Nail Polish,
Sierra.