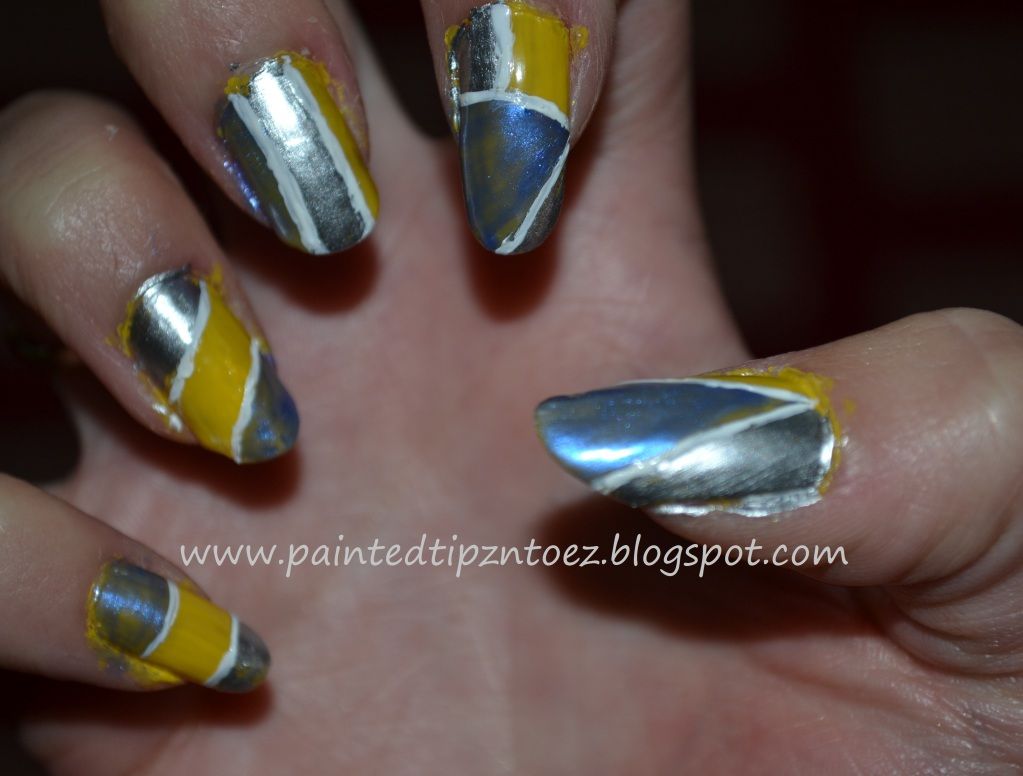
This is my current manicure using my two new polish "Fierce N Tangy" and Sturdy Sapphire", plus white and silver. It wasn't my favorite, but it will do for a few days!
Colors I Used:
"Fierce N' Tangy" from Maybelline,
"Sturdy Sapphire" from Sally Hansen and "Silver Mercedes" from Pure Ice
Last week I decided to have a pirate themed movie party! I knew I need something fun and festive for my nails, so I decided to add some pirate flair to my nails.
Colors I Used: Map Nails- "Best Friend" Pure Ice, "Pearl Black" Kiss Nail Art, and "Primary Color" Finger Paints Skull and Cross Bones- "Electric!" Pure Ice, and "134 French Tip White" NYC Pirate Face Nails- "Best Friend" Pure Ice, "134 French Tip White" NYC, "Primary Color" Finger Paints and "Pearl Black" Kiss Nail Art,
How I Did It:
I think the Map nails, explain them self. I used my fine tip paint brush for all of the details and I thought these turned out great!
The Skull and Cross Bones were a little more difficult. I used my dotting tool and kept working at the shape of the skull till I thought it looked right. For the Cross Bones I painted an "X" then with my dotting tool added two dots and each end of the "X." This design was really simple you just have to work at it will you get the shape correct.
For the Pirate Face nails, I started by painting it the base coat. Then I add a thick, red stripe to 1/3 of my nail. This will become the bandanna of the pirate. Once, the red had dried I add some white dots with my dotting tool. I add to black eyes and a reddish/pink smile. For the nose of my pirate I used the same polish as my base coat but mixed it with some white polish. The Pirate face was a little hard but looked super cute when I done. Over all this was on the moderate scale for nail design. I had a lot of fun with it and really liked the way it turned out.
XOXO's
Love and Nail Polish,
Sierra
The week I decided to go for an all-out Christmas design. So I figured what was more Christmas than a Christmas tree and Lights. I think the design turned out great and it is definitely one of my favorites!
The colors I used in this manicure are:
For the French Tip= "French Tip" from NYC and "French Lingerie" from Rimmel
For the Tree= "Camouflage" from Rimmel, "Hot for Chocolate" from Revlon and random colors for the ornaments
For the Lights= "Yellow" and "Pearl Black" from Kiss. "Bright Orange" "Red Glitter" and "Green Glitter" from LA Colors
To start this manicure I painted a basic white French tip.
Next, I did the lights. To paint the lights, I used a fine tip striper in black. I painted wavy lines down my nails, occasionally doing a loop. Once, the line was painted I added small black lines coming from the main black line. This is the line where I started the bulbs. To paint the Bulbs I used four different stripers. The colors I used for the bulbs were "Red Glitter," "Green Glitter," and "Bright Orange" From LA Colors and "Yellow" from Kiss. I carefully placed the brush on the small black line. Then, I pulled the paint out to make the lights look attached to the wire. The Lights could have been a manicure by itself but I decided to add a Christmas tree to my Thumb. To paint the Christmas tree, I started by drawing three triangles, making the different levels of the tree. Next, I filled in each triangle using "Camouflage" from Rimmel. To make the stump of the tree I used "Hot for Chocolate" from Revlon and painted a small rectangle at the bottom of the tree. For the ornaments I used a red, yellow and orange polish. I carefully placed dots around the tree using my dotting tool. To finish this Christmas inspired mani I place a clear top coat over to protect the design. Over all this mani was slightly difficult but if you have a steady hand it can be easily done.
WE GOT A PUPPY!!!! Last week my Parents surprised my siblings and I, with an 8 week old puppy. After, taking him to the vet we found out he is a German Shepherd/Chow mix. He is the most adorable thing ever!! He was also my inspiration for my manicure this week!
The colors I used in the mani were:
Base Coat: One coat of "Copperglaze Platinum" over two coats of "Totally Toffee" both from Revlon.
Paw Prints: "Hot for Chocolate" from Revlon
Puppy: "French White" and "Black Cream Lace" from NYC, and "Totally Toffee" from Revlon.
To do this design I started by painting the base coat. I thought "Totally Toffee" was to dark and "Copperglaze Platinum" was too light. However, when I layered the polishes I loved the shade. I also added a matte top coat "Matte-ly in Love" from Hard Candy, to take the shiny from the polish.
After, the base coat dried I painted the paw print. To paint the design I placed a dot of "Hot for Chocolate" polish on an index card. Then using a random idem I found in my room that was the right width I place three dots on my nails, for the center of the paws. Then, to make the toes, I added four more dots using my dotting tool. Making the paws was super easy and I think they turned out great. Painting the puppy was a little hard though.
To paint the puppy I made a semi-circle using "French Tip." Next, I painted the eat using the same polish and a fine tip paint brush. After, the white had dried I made another half circle inside the white using "Totally Toffee" this creates the snout for the dog.
Lastly, I add the eyes, and nose using a dotting tool. To create the mouth I used a fine tip paint brush. Then drew a vertical line and then two small diagonal lines on the brown snout.
Over all this mani was fairly easy and I got a lot of compliments on it.
I also include a tutorial below that explains how to paint this cute manicure.
Since I loved my ying-yang pedicure so much I decided to do the design on my nails. This mani took about two hours and lots of thinking about how to get the design right. I decided I didn't want to paint the ying-yang symbol on all my fingers so I decided to paint it just on my thump and ring finger. To get the design straight I used and pencil and a permit marker to draw the outline. Then I filled the online in with my black and white polish using a small tip paint brush. For polishes I use "Liquid Leather" from China Glaze and "White" from I Love My Nails. For the rest of my nails the design was very easy. I used the same colors but painted French tips. Then I used my dotting tool to paint the small designs on the tips and a fine tip brush to paint sliver line. For the silver polish I used "Silver" from LA colors. I debated on adding some glitter but I never got around to it. Over all this mani was semi easy, the hardest part was getting the ying-yang symbol correct. This is probably another one of my fave mani.
Until next time.
XOXO's
Love and Nail Polish,
Sierra
Oh how I love doing nail art!! Usually I don't have the time or the patient to do a time consuming nail design. However this week I decide I wanted a challenge so I decided to paint these POW nails. This mani took three to four hours to do paint. Probably one of the longest manicures I have done in a while. For the base coats I used "Blue Collar" from Orly, "" from Revlon, and "Free Fall" and "Wild Thing" from Pure Ice. For the yellow color I layered "Excuse Me" from Pure Ice over "Lemon Fizz" from China Glaze. For then Black and White I used "Liquid Leather" from China Glaze and "White" from I Love my Nails.
This design looks a lot easier than it was too created. But I love the way it turned out.
XOXO's
Love and Nail Polish,
Sierra